
My 2001 PCT Gear Reviews
Following are some reviews of the gear that I used on my PCT thru-hike. A detailed list of my gear weights are listed HERE
__________________________________________________________________________________________
I. Base gear (non-consumables)
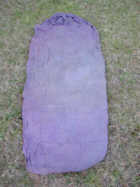
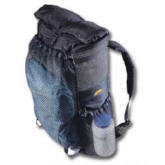 GoLite "Breeze" backpack |
I must admit that I was somewhat skeptical at first while considering the ability of a backpack which weighed less than a pound to hold up for the kind of test that a multi-month thru-hike can demand. After 109 days on the trail all of that skepticism has now been transformed into a genuine respect for a very tough and functional piece of equipment... while not perfect, it certainly did the job and is the most practical pack I've ever used. With that said I'll elaborate on a few aspects of my experience with the "Breeze". I'm one of those who prefer to have a waist belt and think that the additional 4 to 6 ounces is worth it. Since this pack doesn't have one I ended up using a 5 ounce Jansport fannypack that I picked up at REI which provided excellent weight transfer to my hips. I usually just put some of my extra clothing in the fannypack to fill it up. The only problem I had with this set-up was the constant friction created between the backpack and the fannypack and by the time that I was in northern California I noticed several VERY thin spots in the material in the very bottom of the pack. Thanks to the miracle of duct tape (inside & out) I was able to control the friction and the pack then made it fine through Oregon and Washington. On weekend trips I prefer to use the pack without the fannypack support and with no problems, but when on the multi-month hike I found that I liked having it. Also, I started out using a small EMS fannypack in the desert but it only lasted to Iddylwild when the seams busted. Fortunately Iddylwild had an outfitter where I picked up a more durable (Ha!) Patagonia fannypack, but the price tag ended up being the only durable thing about it because the both the zipper and the seams were blown out by the time I got to Agua Dulce. Thanks to the generosity of the Saufley's (trail angels) I got to the REI in Los Angeles and picked up a 5 ounce Jansport fannypack which was half the price of the Patagonia and that was one good piece of equiptment because it handled the constant daily abuse very well and made it all the way to Canada and is still in usable shape. To my surprise I really never missed having a sternum strap and I believe that this feature is most useful on the packs where a lot of weight is being carried, but I found the "Breeze" very comfortable without this feature. |
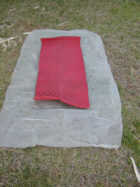
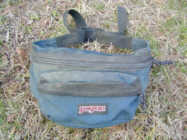 Jansport fannypack |
This is what I would consider to be a full-size fannypack capable of handling the weight of my beltless backpack as mentioned in my review of the GoLite backpack above. The factory packaging listed it at 6 ounces but after cutting out the inside pouch and other unnecessaries I got it down to about 5 ounces. This was a tough fannypack and handled the loads over the miles perfectly. Since my PCT hike I have sewed in a small nylon hip belt directly to the pack itself, but I haven't yet trail tested it and have high hopes that it will eliminate the need for this fannypack thing on future hikes. |
 Cassin "Ghost" ice ax |
The manufacturer claims that at about 8 ounces this is the lightest ice ax on the market and that was good enough for me. I only used it from Kennedy Meadows to Tuolomne Meadow's, but on high snow years you might consider keeping your ice ax on to Sonora Pass before mailing it back home. This particular ax is certainly not the heavy duty tool that you would need for serious ice climbing or glacier trekking with 60 pound packs, but for a spring or summer hike through the Sierra's the Cassin "Ghost" is plenty sufficent to ensure safety if you had to recover from a fall on a steep snowy pass while hiking the PCT. I'd say that it is "just right" for the reason I needed it. It seems to be quite durable for the weight being made from aircraft grade aluminum and I made a wrist leash from Kelty "Triptease" line. |
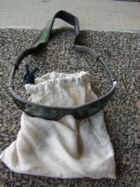 Sunglasses w/silk pouch |
I picked up these $15.00 "terminator" sunglasses from my local Wal-Mart with full ultra violet rays protection and they made it just fine all the way to Canada without a scratch! They became a part of my very body as I hiked through the desert section and since the PCT is a very exposed trail, I used them most of time even after leaving the desert behind. I also picked up a two dollar lycra band to help keep the glasses on my head for the long haul and when the sweating became intense. When not in use I stored the glasses in a tiny silk pouch that my sleepin bag liner came in and just put them in one of the small exterior net pockets on my GoLite backpack. |
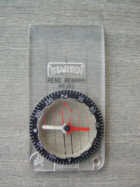 Silva Compass |
This is probably the most basic compass that Silva makes, known simply as a "starter" compass weighing in at only about an ounce. Considering that I didn't have a compass at all on my AT thru-hike I considered this a major step up for me! It was accurate and still points perfectly toward the magnetic north every time that I pick it up so I can't imagine that I'll ever upgrade. Plus, I'm just not a "bells & whistles" kind of guy but if you are then I'd suggest getting their Rolls Royce model compass :-) |
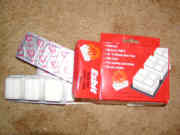
 Money, credit card, drivers license, etc. in small zip-lock bag |
Before hiking the PCT I'd always packed a regular nylon wallet, but now that I'm a cheerleading proponent of common sense ultralight gear I've now made a great leap forward by packing this genuine pint sized wallet made by Zip-Lock! I carried it in the rear zippered pocket in my shorts until I must have sat down the wrong way and bent the heck out of my Visa card and that was a near panic situation being several thousands of miles from home! Miraculously it continued to scan OK but I began packing it safely in the softer areas of my backpack from that point forward. |
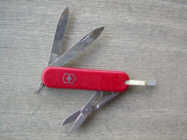 "Classic" Swiss Army knife |
I've never worn out a Swiss Army knife and always lose one first. At under one ounce this little work horse of a knife can do everything necessary while on a long distance hike, but I do wish that it had a can opener on it. |
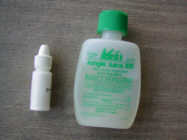 Insect repellant (in Rembrandt breath freshener bottle) |
I kept the larger bottle of deet in my drift box and periodically filled up the smaller bottle (a small Rembrandt breath freshener bottle) of the bug juice that I carried in my backpack. I didn't need any repellant through the desert but I'd highly reccomend packing it from the Sierra's on to Canada. |
Shelter/sleeping system
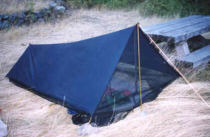 Henry Shires Tarp/Tent |
My tarptent performed well beyond my expectations during my '01 thru-hike of the PCT and I couldn't imagine using anything else if I were to do the hike again. I probably wouldn't reccomend taking such a shelter to a rain forest, I feel that this is perhaps one of the best choices for an arid trail such as the PCT. I found it very versatile in setting up according to the conditions of a particular day: On warm, calm nights I tended to set it up a bit high, sometimes proping up the front aluminum pole as much as ten extra inches with a rock or log then tying off the front two corners more like a regular tarp thus providing a lot of space, however the no-seum netting couldn't be zipped up in this set up. On cold, windy evenings I would set up as low to the ground that I could possibly stand with the side facing the prevailing wind staked flush to the ground. I found that this shelter held up very well in the wind when set up this way. Most of the time during my hike I prefered using rocks instead of stakes, but when I did use stakes I normally put a nice sized rock on top of them. As for bugs I found that the no-seum netting sewed around the edges of the shelter was adequate for repelling the worst of the mosquitto's and I especially loved the zipper on the front entrance. Yes, occasionally one or two bugs managed to get in once in a while but I'd say that the netting was at least 99.9 percent effective. On the few occasions when I encountered rain I usually set it up in the same fashion as I did for windy nights... as low to the ground as I could stand. In 109 days I never had any drenched gear while in the shelter during the rain, however there were plenty of times when I would receive a misty-type "spray" when the rain drops would hit the highly exposed front of the tarptent on the no-seum netting, but that netting was most efficent in breaking up those rain drops into a more manageable mist which I was able to find creative ways to deal with. I did use some of those sticky dime-size velcro pieces to make a "garbage bag" shield on the front of my tarptent, but I found that just putting more thought into where and how to set up the shelter (low and one side facing the wind) was plenty effective in keeping me and my gear dry. Dealing with condensation is just another one of those trade-off's for a lighter pack and a comfort level that I'm personally willing to tolerate, but it really wasn't that big of a problem for me. There were many nights when the underside of my tarptent became quite wet, but it's something that I soon developed a constant "sixth sense" for while I slept in at least keeping my sleeping bag from making contact with the ceiling which was hard when I had to set up very low to the ground. I used a down bag on the hike which sometimes got sticky damp from condensation, prespiration, damp weather, and who knows what else :-) but never so bad that I wasn't able to sleep "sticky-style" in it until I could dry it out on the first sunny day... usually drooped over my shoulders as I hiked. That was basically my experience with the tarptent which certainly more than met my criteria for a quality hike, both functional and spacious, and there really weren't too many of those sticky nights :-) |
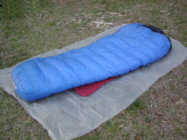 Western Mountaineering "Ultralite" sleeping bag atop 2 mil plastic ground cloth and a Mt. Washington "evazote" sleep pad. |
This is not an inexpensive bag and I've never known it to go on sale, but if you can afford it then I'm pretty sure that you will be greatly pleased... or at least I have been! Until getting this bag I had always used one of the synthetic fill bags which always lost their loft after a relatively short period of time and in my opinion they aren't good for a full length long distance hike. The Ultralite is filled with a very high grade down and after using it on my Colorado Trail thru-hike in 2000 and the Pacific Crest Trail for 109 days in 2001, I really can see no loss of loft and have every intention of using it on many future long distance hikes. At only 27 ounces it easily passes my standards for a quality piece of ultralight gear and it's factory rated at +25 degrees (F), but many owners swear that it's a +20 (F) bag easily, myself included. Since down is a bit more difficult to clean I have always used a liner (see "Jagbag" below) mainly to help keep it clean, but the liner also adds 5 or 6 degrees of warmth as a bonus. During my PCT thru-hike I never zipped up the bag from Mexico to Canada, sleeping in the liner and using the bag as a big ole blanket... even through the frozen sections of the High Sierra's! Yeah, it's made from goose down which you can't get wet, but I've always been a very contiantious hiker and take every precaution to keep it dry. If you gauge yourself on the hap-hazzard or clumbsy order of personalities, then perhaps a down bag isn't for you... but it's the greatest thing that ever happened to my sleeping on the trail... except perhaps for the tarp/tent. |
 Jagbag "endura" silk sleeping bag liner. |
As previously mentioned I got this sleeping bag liner mainly to keep my down bag reasonably clean, but it also adds several degrees of warmth. I especially enjoyed sleeping in it alone while in the desert and it also was quite handy when I had to sleep over in the airport. Jagbags are made by a very small company in New Zealand and this is a quality item! I always washed it when taking a shower in trail towns since silk is cleaned best with a hair shampoo. It air dries extremely fast when hung out for a few minutes so keeping it clean was not a pain. |
 Mt. Washington "evazote" sleep pad atop 2.0 mil plastic ground sheet |
As for the Mt. Washington sleeping pad I first must state that my personal level of comfort on this item is probably much different than some folks. I guess that I'm one of those people that can get a good night's sleep on a solid sheet of rock so I can easily adjust to just about any kind of pad, therefore I chose the very lightest in the Mt. Washington pad. As compared to the Ridgerest or the Z-Rest, I can only see miniscule differences other than the durability factor since the Mt. Washington pad is made from evazote... but it still made it for 109 days on the PCT just fine although a bit flattened just as all the pads will become after months of use. I've discovered that sleeping pads are probably one of the most non-compromising pieces of gear on the trail and each hiker must therefore determine their own level of comfort in this department.
I always slept with the egg-carton side up but another hiker "G.T." whom I shared several campsites with had the same pad and he always slept on the flat side. I personally loved that egg-carton feel after trying it both ways, I guess that really doesn't matter a lot in effectiveness. While considering a good ground cloth the mylar space balankets work for some but they just spelled trouble for me, since they tend to "crinkle" too much, blow around too easy, and are a big ole mess (for me, anyhow) to fit back into my backpack since it seems like they never again can be folded back into that nice neat little compact configuration of a package they come in when new, sooooooooooo... I then got one made from tyvek which was about 5 oz. and was satisfied with it until someone said that his simple 1 MIL plastic groundcloth lasts a very long time for him. So I then head out to my local Wal-Mart and buy a huge 1 MIL plastic paint drop cloth for $2.98, cut out my preffered size ground cloth (12" on each side of my 3/4 length ground pad and 24" beyond the pad at the foot) weighing in at 2.5 oz. Well, like the thin mylar the 1 MIL plastic was just too fragile and flimsy for me. I then tried the 2 MIL plastic and found it to be what I was looking for and the same size weighed in at just 3.2 oz. While I could have cut the plastic another foot or two longer, I just use my backpack, extra trash bag, rain jacket, or whatever for my head area. So far, this is what's working for me. |
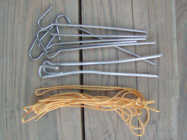 Titanium tent stakes and Kelty "Triptease" cord |
At $3.00 each you learn to respect titanium stakes. It's the sort of item that I just had to buy... once. They're strong and I like them but you can also get by just fine without 'em. I managed not to lose a single one of them from Mexico to Canada so I can now look forward to guarding and protecting them during my next long distance hike! As for the Kelty "Triptease" line, I have no plans to buy anymore of this very expensive cord. I used it for guy lines on my tarp/tent and carried a 35' piece for miscellaneous use. Although it never broke or failed, the cord developed numerous places where the white "inner" cord festered through the outer layer for no apparent reason. For the expensive price this cord should have remained in one solid piece like it was made! |
Clothing system
(also, see No. III below... clothing I'm wearing)
 Railrider "Adventure" pants & a thrift store silk shirt. |
The Adventure pants was my only pair of long pants and I packed them all the way to Canada, providing good sun protection in the desert and wind protection in the high country. They aren't waterproof but for 3-season hiking they are quite sufficent for me. Like most ultralight gear these pants have the potential to wear out fast since there are no reenforcement patchs on high friction areas like the knees or seat, so you have to treat them accordingly and they will last for thousands and thousands of happy trail miles. Just stay off the knees and always pull out your sleeping pad for your trail breaks and you'll be just fine. I really love these pants when on the trail! The silk shirt is another story. I also packed this black silk shirt all the way to Canada and considered it my "dress" shirt, especially when I was in trail towns. I recall how mungy we were on the Fourth of July going into Dunsmuir, then after a quick shower and change into my Adventure pants & silk shirt the "Three Amigo's" couldn't believe that it was the same me! I'll never forget their looks of surprise since they knew that I was an ultralight backpacker so how could I be carrying all those nice clothes!?! All I can say is that my base weight is under 10 pounds so I don't plan to give up either anytime soon! However, I don't reccomend using silk as your primary backpacking shirt because that is what I started out using from the Mexican border and it was torn to mere shreds by the time I reached Idyllwild where I purchased a good polyester shirt. Silk definitely has its place on the trail, but it's not the best when it comes to the severe friction created between pack and body. |
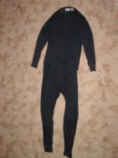 Silk Skin's uppers & lowers. |
I had the full set of Silk Skin's however I only packed the upper all the way, taking the bottoms out of my float box for the colder Sierra's and Washington. I love the way silk feels against my skin and they are lighter than the synthetics so I plan on sticking with silk undies for quite a while. |
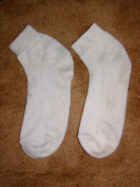 Coolmax liner-type running socks |
On the Mexican border I started out using a mid-weight Thor-Lo hiking crew sock but after the first 500 miles they were just too much in competing against my swollen feet for hiking shoe real estate! Therefore I was fored to try out a thinner sock and I suppose that any of the liner type socks will work, but I'm presently using the coolmax running socks found at Wal-Mart. They tend to wear out fast but they work well with my feet and keep them a lot cooler while on the trail for 15 hours a day. |
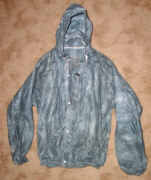 Frogg-Togg rain/wind parka |
I was skeptical at first but after 2,658 miles on the PCT I am still alive and thus a proponent of Frogg Togg's. They are waterproof, but they are more breathable than any rain parka I've used. At times I was concerned about the friction created on the parka when I had to wear it under my backpack on rainy days, but it held up just fine. I only packed the parka and opted to use my Railrider "Adventure" pants instead of the Frogg Togg bottoms. |
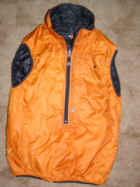 Moonstone "Cirrus" vest |
For the most part I kept this article in my float box except for the Sierra's and Washington. I love this little vest and consider it a little oven considering what little space that it takes up in my backpack. Highly reccomend! |
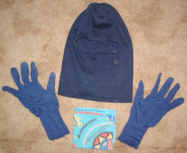 Thermax ski mask, PolyPro liner gloves, and a cotton bandana. |
I packed the same thermax ski mask that I've owned for 15 years and a liner set of polypropelene gloves that I've owned for 10 years. At times I wished that I'd had a more waterproof set of gloves, but I made it just fine. |
Cooking system
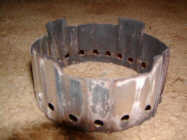
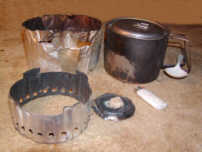 From left to right (back): Wind screen, MSR Titan Kettle with a Lexan spoon (in pot handle). (front): Homemade pot holder, Pepsi can bottom to hold Esbit fuel tablets, and a Bic lighter.
|
As for my cooking system I made the pot holder/stove from a two inch deep piece of regular square aluminum rain gutter pipe, like that draining the gutter on a house roof. Actually I just bought a small elbow of the drainage pipe at a Home Depot type store. After cutting out the two inch section of pipe I worked it with my hands, a screwdriver handle, etc. until it was near perfectly "round". I found that my MSR Titan Kettle fit absolutely perfect atop the rim, just slightly smaller in diameter than the pot so it was also a perfect fit inside the Kettle after the meal for storage in my backpack... a great set up! I then put in a series of "intake" ports using a quarter inch drill bit all the way around the bottom, 1/2" apart (center to center) and 1/4" from the bottom of the pipe section to the bottom of my drilled holes. Using my Dremel metal cutting wheel, I then cut out four "outtake" chimneys evenly spaced around the top rim of the pot holder 3/8 " deep and 2 1/4" wide. Hope that made sense and the final product is really simple looking. I also cut out the very bottom of an aluminum coke can to use as a base to put my esbit tablet on for burning which was especially useful when the ground was wet or when I couldn't find a rock. For the windscreen, which also fits just right inside the kettle, I picked up one of those thick pieces of aluminum at Wal-Mart that folks put on the bottom of their ovens to catch drippings and cut out a strip 16" long and 3 1/2" wide, then cut out little sections at each end so that I could overlap the pots handles and wrap it up snug to the pot. This system works great for me and I've never found anything better since! |
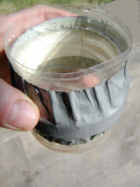 My famous PCT homemade cup. |
For years I never used a cup and opted to just use my one cooking pot as a cup before, after, or between meals with a total weight of zero... however, it really is nice to have a seperate cup for various trail beverages and I really like having one for dipping water from a shallow spring along the trail.When I hiked the Colorado Trail last summer I found that an 8 oz styrofoam cup fit just perfectly snug into my MSR Titan Kettle and that cup was so light that I can't even get it to register on my postal scale. I thought that I'd finally found the perfect excuse to pack a cup since it was so light and it packed so efficently into my MSR pot. While attending the ADZPCTKO at Lake Morena this spring before setting off on the Pacific Crest Trail, I was showing off some of my gear and Carol Wellman "Brawny" expressed concern about my styrofoam cup being porous... which could possibly explain my severe sickness while on the Colorado Trail. It sounded logical to me so about five of us spent the next 3 hours inventing a new cup for me. We rounded up all the water bottles that folks were discarding and cut out the bottom one/third, then placed them one at a time into boiling water which shrank them a bit and kept doing this until I had a cup that would fit perfectly snug (just like my styrofoam cup) into my MSR Kettle. The plastic was still too hot to hold so I cut a circular one inch strip of styrofoam from my old cup then placed it mid-way around the new cup, held in place with a piece of duct tape. Not only did that cup win me a nice prize that evening in the homemade gear contest, it lasted all the way from Mexico to Canada weighing in at 0.7 oz and it holds almost exactly 12 oz of liquid. Yeah, I could still just use my pot as a cup but when you've cut the base weight of your backpack to 9.5 lbs... you can certainly justify a few small luzuries such as a cup much easier that before the days of ultralighting! |
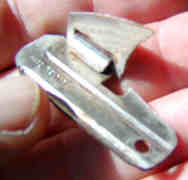 Can opener. |
Just your basic metal can opener found in the camping section of your favorite department store. I put this one to the grinding wheel and shaved off quite a bit of that heavy metal then drilled a new hole. |
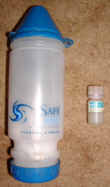 Safe Water Anywhere filter bottle & iodine tablets in a tiny Nalgene bottle. |
I used this 1/2 liter filter bottle on both the Colorado Trail and the PCT with good success. If you're one of those hikers that must filter every single drop of water that you use then I wouldn't reccomend this filer for the job. After being on the trail for thousands of miles I've developed a sixth sense about detecting bad water and filtering is a rare occasion. In a hurry I like having it to filter various creek water when I can't find water at the source. If I can see the water flowing directly out of the ground then I consider the good earth the best filter ever made! This filter does tend to require regular maintenance and clogs up easily if there is a lot of silt or such in the water. I carry a used toothbrush in my repair kit which I can scrub the filter element without having to take out of the bottle which would require packing a metal wrench. |
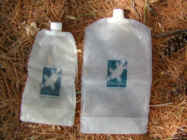 Platypus water bags...2.4 liter & 1.0 liter. |
For the weight and packability when empty I absolutely love these bags. I treat them with care and have never sprung a leak so they score high on my list! They last a long time for me because I treat them with care by always setting them upright when full with water or I only lay them down flat on a soft surface like my sleeping pad. In my opinion the best feature is that they take up virtually no space in my pack when empty since I can just squeeze out all the air and tighten up the lid. |
Repair kit
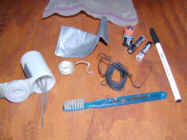 Repair kit |
Sewing needles & safety pins in 35mm film canister, duct tape, dental floss & nylon saddle thread for sewing repairs, extra writing pen, batteries, and a tooth brush for cleaning SWA water filter. |
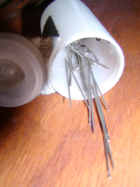 Close-up of 35mm cannister with sewing needles, etc. |
Just a close-up view of another good use for 35mm film cannisters. Unfortunately my supply of cannisters will soon dry up since I have recently gone digital!!! I would also put my spare camera and radio batteries in this cannister which kept them stable and from rattling all over the place. Also, note how I placed a small strip of duct tape over the lid to double secure it... sure don't want a bunch of loose needles to escape all over the inside of my pack! |
Hygeine kit
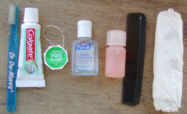 Hygeine kit. |
Childs toothbrush, toothpaste, dental floss, hand sanitizer, camp suds, comb, and toilet paper. I started out packing one of those very small "childrens" toothbrushes in allegiance to keeping everything ultralight, but I ended up hating it every night and I just felt clumbsy using it. Finally, logic kicked in when I realized that my packs base weight was already 9.2 pounds so what was the point of shaving off a whopping three tenths of a single ounce by using the childs version?!? Well, after the logic of the moment kicked in I had a small celebration at the next town where I jubilantly purchased one of those wonderful full-sized toothbrushes and I now had something to look forward to each night! It's not in the photo but I used a very small mesh bag to store all of these items and kept that in one of my exterior mesh backpack pockets because these items were very prone to bacteria so I wanted to keep everything as air dried as possible. |
Office kit
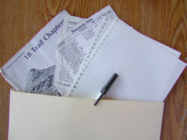 In a large zip-lock bag: journal paper, writing pen, guidebook sections |
This was perhaps one of the most important parts of my gear because this is where I kept my journal which I religiously made a detailed entry every day of the hike and it was very important to me to record an experience that I'd dreamed about for so many years... I never wanted to forget it. I used an 80 page small ruled spiral notebook in my drift box and took out only enough pages to get me to the next post office. I used a regular file cabinet folder which I cut to fit inside my journal pages, then I just scotch-taped the ends. The thin cardboard-like folder did a good job keeping my journal pages in good shape until I could unload the finished pages back into my drift box at the next town. |
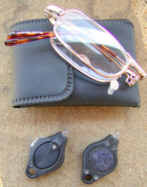 Folding reading glasses and two Photon flash lights (yellow & clear). |
I found these folding reading glasses at my local Wal-Mart complete with velcro carrying case and consider them one of my best finds! They are very light, compact, and functional... everything that an obsessed ultralight backpacker could possibly desire! The Photon lights are also one of my favorites and have completely retired my old Petzel headlamp. I used the white colored light for reading mainly and when I needed to see things in their real colors. The battery in the yellow Photon light lasted twice as long as the white light (about 15 hours, I think) so I would use it for setting up my tarp/tent after dark, cooking, and just general rambling around with my gear... including night hiking through the desert. I also attached a piece of dime-sized sticky velcro on one side of the Photon light and the other piece I sewed to the underside of my ball cap bill, so now I had a very bright half-ounce headlamp whenever I needed to free up my hands such as when I was setting up my campsite after dark. I also kept it attached to my ball cap during the night so that if I needed light during the night, the small light would be easy to find. |
First-aid kit
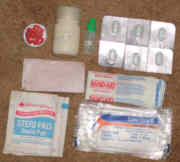 FirstAid kit. |
In a small zip-lock bag: Band-Aids, Neosporin, Gauze pads, Imodium AD tablets, Ibuprofen tablets, Butterfly strips, and sunscreen. Just a few very basic items and mainly a bandaging kit. If I had ever neeeded more than this then I'd just have to wait on the helicopter! The biggest and most important part of any first-aid kit can not be photographed since that is the storehouse of knowledge and wisdom to prevent accidents that is mostly gleaned from various life experiences and the lessons learned. Being completely confident in your ability to enter the wilderness is a time bomb waiting to explode, so always be open to learning more about safety on the trail no matter how many thousands of miles you've hiked. |
Survival kit
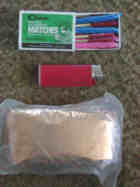 Survival kit |
In a small zip-lock bag: Box of Coghlan's waterproof matches & 4 birthday candles, bic mini lighter, and an emergency blanket. Dead weight for sure but having it made me feel a little more prepared for the unexpected so I'll probably continue to carry this dead weight for thousands of more miles. |
Luxury items
 In a small belt-pouch: An Olympus Stylus Epic 110 zoom camera, and a mini tripod. | My camera will never be on the bargaining table because recording the experience for future reference and memories is that important. This particular camera took good photos that I can't complain about and I thought that the 110 zoom lens was the key to some much better pictures. The mini tripod was also in constant use for a stable camera and self portraits. One of the tripod's legs had a piece of velcro attached so I could attach the camera to things like fence posts, tree limbs, highway signs, etc. I kept the tripod attached to the camera all the time and it rode quite well hanging on the outside of the camera pouch. This tripod cost only about $8.00 from Campmor and has been on three major thru-hikes so far and is still going strong! |
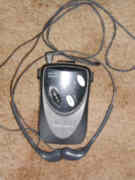 Radio Shack AM/FM radio receiver headset |
This is another one of those "no compromise" luxury items which I will always pack. Several months alone on the trail is a long time and I greatly enjoy the company of the radio from time to time for news, weather, or mind provoking talk shows. I picked up one of the cheapest models at my local Radio Shack and a set of AAA batteries would last for several weeks and sometimes I'd have it on for a very long time. |
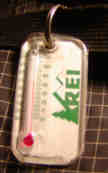 REI keychain type thermometer |
I clipped this thermometer on one of the outside straps of my backpack and liked to know the temperature, especially during the early morning hours and when I was in the Sierra's so that I'd have some idea how cold the water would feel when I fell into one of those freezing streams while fording across!!! |
II. Consumables
 Esbit solid fuel tablets |
Using solid fuel tablets is similar in personal opinion relating to using one of those heavy Thermarest sleeping pads... you either love 'em or you hate 'em. Personally, I can't say enough good things about Esbit tablets if I were to talk non-stop for 5 hours! I only pack one tablet per day in my pack which will cook one complete meal with usually a small portion of the tablet left over for future use and each tablet weighs only a half ounce for gosh sakes!!! No they don't provide the "instant" swoosh of heat like one of those heavy gas stoves and yes they heat and cook your meal slower thus requiring more patience, but at a half ounce of fuel per day and a stove that only weighs an ounce... I have learned to absolutely love the Esbit. |
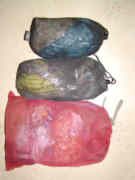 Three various sized food bags. |
I carried one big nylon mesh bag that measures about 10" X 12" that I got at some department store and just doesn't seem to wanna wear out after three long distance hikes. I also packed two smaller mesh bags made by OR (Outdoor Research) which have also been good food bags over the years. I met several thru-hikers who were using all kinds of things for food bags, such as tyvek postal envelopes and plastic grocery bags, but I like to have some strong, light, and dependable food bags to organize, stabilize, and manage around the cracks and crevaces of the innards of my backpack. |
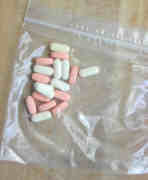 Vitamins |
Don't always have a lot of fresh food inbetween trail towns so I am a stong believer in packing my vitamins on the trail. Each day I took one big ole multiple vitamin, 1000mg of vitamin C, 800mg of vitamin E, and 200mg of selenium. I would suggest taking at least a good multi-vitamin each day and eating all the fresh fruits, vegetables, and whole grain foods that you can handle while in town. |
H2O |
I hate hauling water and rarely ever did so... until I was introduced to the desert along the PCT in southern California! As a general rule I will drink as much as I can hold each morning while packing my gear since hauling water in my stomach is much closer to my body's center of gravity than is somewhere in my backpack. |
III. On my body/wearing
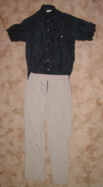
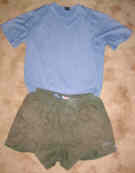 "Speedo" multi-use shorts and Mountain Hardwear hiking shirt |
Although I had an extra pair of hiking shorts in my float box, I only packed one pair of hiking shorts... the ones that were on my body. I started out using Super Shorts made by REI but found them too restrictive and anything but a loose fit. On a side trip into Los Angeles I picked up a pair of multi-use shorts made by Speedo and those have been the most comfortable hiking shorts that I've ever used! Having the kind of clothing that makes my body happy is worth just about any price to me and at about $30.00 per pair, these Speedo's have more than met my criteria for a "happy" pair of shorts! The shirt is made from 100 percent polyester and made by Mountain Hardwear... also an expensive shirt but after thousands of miles and a ton of backpack friction it is still going strong and I'll use it again on my next thru-hike. |
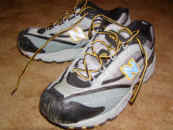 New Balance 803 AT trail runners |
When I was looking for a good lightweight shoe to complement my new ultralight gear I soon learned that my choices were greatly limited since there were only a few trailrunner's that came in the ultra-wide size that would accomodate the width of my feet. New Balance was one of those companies that made 'em wide so after a bit of research I ordered a pair of the 803's and immediately upon putting them on my feet I knew that they were going to be a long time friend... my feet felt so good! Granted, they will not provide the same results for everyone, but they have been good to me. I burnt three holes on the inside center of each shoe initially for ventillation in the desert section of the trail, but I later appreciated the fact that they would drain water much quickly after fording the endless stream crossing in the Sierra's. The shoes held together better than expected and I used the same pair for 1,500 miles through all of California to Castella where I picked up my second pair. I now realize that this was WAY too far to push a pair of trailrunner's and most certainly did compromise the health of my feet and making an accident much more probable. In the future I will most likely switch out for new shoes every 800 to 900 miles... that's definitely plenty for a pair of these light shoes. |
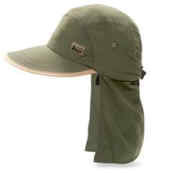 REI "Solarweave" Sahara hat |
I used the tan colored version of this hat all the way through the desert section and into the Sierra's where upon climbing Forrester Pass a wonderful gust of wind ate it right off my head taking it into the great beyond to never be seen again! When Eric of Tennessee finally caught up to me in Oregon I learned that he had found my hat a thousand miles behind us but had mailed it back home when he couldn't find the rightful owner. I hated to lose this hat because it was light being made from supplex and I could crumble it up to my heart's delight inside my pack then it would "pop" right back into shape for the day. The overhanging neck flap was not only nice to shield the sun through the desert, it also did a nice job shielding some of those cold morning breezes from my neck! If I still had the hat I would sew some tie lines to the overhanging neck flap so that I could securely tie it to my neck during windy days. |
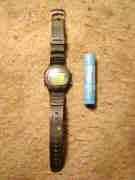 Cassio watch and Chapstick (30 spf) |
Don't leave home without 'em and especially the 30 spf chapstick which will save your lips from the sun and wind from Mexico to Canada... use it religiously a couple of times each day. |